
All patterns in PDF format. All prices in USD.
Pattern Catalog
Resources
•
There are two (2) naming conventions for cables in common use in North America (plus slight variations thereof).
Method 2: Right / Left + Stitch Count
This convention uses the direction that the cable stitches travel as the identifier along with how many stitches are crossed over how many stitches.
This method would identify the cable in R3 of the chart at the left as 2/2RC (2 over 2 Right Cross/Cable - stitches on cable needle are held to back of work during cabling process - all stitches are knit),
The cable in R7 is a 2/2LC (2 over 2 Left Cross/Cable - stitches on cable needle are held to front of work during cabling process - all stitches are knit).
Crossing Knits over Purls:
For knit stitches crossed over purl stitches a "P" is added to the stitch abbreviation e.g. 2/2RPC (2 stitches are placed on the cable needle and held to the back, next 2 stitches are knit, then the 2 stitches from the cable needle are purled). Often, this designation is written as 2/2RCP.
Why I like Method 2:
In one word - Clarity.
Method 2 makes irregular cables much more easy to identify. Seeing C5F, it is unclear if you are crossing 1 over 4 stitches , 2 over 3 stitches , 3 over 2 stitches or 4 over 1 stitch. No such ambiguity exists with the second method.
If a stitch is designated 3/2LC it is clear that
- 3 stitches are crossed over 2 stitches,
- all stitches are knit stitches and
- the 3 stitches are held to the front of the work during cabling.
The Downfall of this Method:
Some individuals have a really hard time with directionality and therefore find the Right / Left directions difficult. One little mnemonic to help out is the for Right cables, the stitches are held to the Rear (back) of the work.

C4F or 2/2LC
Method 1: Front / Back
(Most prevalently found in the Harmony Guides stitch dictionaries.)
This convention uses the direction in which the stitches on the cable needle are held during the cabling process.
This method identifies the cable in R3 in the chart below as C4B (Cable 4 Back - stitches on cable needle are held to back of work during cabling).
The cable in R7 is a C4F (Cable 4 Front - stitches on the cable needle are held to the front of the work during cabling).
This method is used for naming knit stitches crossed over knit stitches.

Chart was created using Stitchmastery's Knitting Chart Editor software.
Crossing Knits over Purls:
For knit stitches crossed over purl stitches this method often uses "T" instead of "C" e.g. T4F would be 2 knit stitches crossed over 2 purl stitches.
The Advantage of Method 1:
The "B" and "F" designations clearly indicate where to hold the stitches on the cable needle - no need to figure out right or left.
The Downfall of this Method:
In order to know exactly how many stitches are crossed over how many stitches, the chart or cable definition included in the pattern needs to be consulted. Looking only at the C4B designation, it is unclear whether 2 stitches are crossed over 2 stitches or 3 stitches are crossed over 1 or 1 stitch is crossed over 3 stitches.
C4B or 2/2RC
B: Free Cable Stitch Patterns
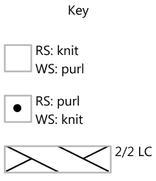
The stitch patterns on this page are very traditional and therefore are free for you to use as you wish. The pictures and charts themselves, however, are copyrighted. They are on this page as an example of both a) how I chart cables in my designs and b) how cables may be charted including legends (keys) and written directions. So please, help yourself to the stitch patterns but do create your own charts to go with your design. Enjoy! The charts, legend and written directions on this page were created using Stitchmastery's Knitting Chart Editor.

R1 (RS): p2, k4, p2.
R2 (WS): k2, p4, k2.
R3: p2, 2/2 LC, p2.
R4: k2, p4, k2.
R2 (WS): k2, p4, k2.
R3: p2, 2/2 LC, p2.
R4: k2, p4, k2.
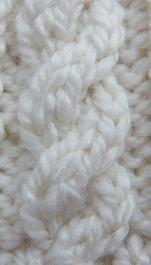
Rope Cable (Left)
2/2LC (Left Cross Cable)
(also written as C4F)
This is a basic Rope Cable slanting upward to the left.
It is a 4-stitch cable -- 2 knit stitches crossed over 2 knit stitches.
For this example, two (2) purl stitches are worked on either side to make the cable "pop".
This 4-stitch cable is crossed every fourth row. A good rule of thumb for crossing cables is to use the number of stitches in the cable to determine the frequency of crossing.
The chart and directions are given for flat knitting (notice that odd-numbered rows are at the right and even-numbered rows are at the left of the chart).


R1 (RS): p2, k4, p2.
R2 (WS): k2, p4, k2.
R3: p2, 2/2 RC, p2.
R4: k2, p4, k2
R2 (WS): k2, p4, k2.
R3: p2, 2/2 RC, p2.
R4: k2, p4, k2
Rope Cable (Right)
2/2RC (Right Cross Cable)
(also written as C4B)
This is a basic Rope Cable slanting upward to the right.
It is a 4-stitch cable -- 2 knit stitches crossed over 2 knit stitches.
For this example, two (2) purl sts are worked on either side to make the cable "pop".
This 4-stitch cable is crossed every fourth row. A good rule of thumb for crossing cables is to use the number of stitches in the cable to determine the frequency of crossing.
The chart and directions are given for flat knitting (notice that odd-numbered rows are at the right and even-numbered rows are at the left of the chart).

6-stitch braid


R1 (RS): p2, k6, p2.
R2 (WS): k2, p6, k2.
R3: p2, 2/2 RC, k2, p2.
R4: k2, p6, k2.
R5: p2, k6, p2.
R6: k2, p6, k2.
R7: p2, k2, 2/2 LC, p2.
R8: k2, p6, k2.
R2 (WS): k2, p6, k2.
R3: p2, 2/2 RC, k2, p2.
R4: k2, p6, k2.
R5: p2, k6, p2.
R6: k2, p6, k2.
R7: p2, k2, 2/2 LC, p2.
R8: k2, p6, k2.
6-Stitch Braid (or Plait)
This stitch uses both a:
2/2 Right Cross and
2/2 Left Cross
This cable is worked by alternating 2/2RC and 2/2LC cables over 6 stitches of Stockinette stitch. in this example, two (2) purl sts are worked on either side to make the cable "pop".
This 6-stitch cable is crossed every fourth row. Normally a good rule of thumb for crossing cables is to use the number of stitches in the cable to determine the frequency of crossing which would indicate that this cable should be crossed every 6 rows. However, since this cable is offset, crossing it every 4 rows still works. If this cable were to be crossed every 6 rows it would just produce a slightly less compact braid.
The chart and directions are given for flat knitting (notice that odd-numbered rows are at the right and even-numbered rows are at the left of the chart).

Alternating or Snake Cable


R1 (RS): p2, k4, p2.
R2 (WS): k2, p4, k2.
R3: p2, 2/2 RC, p2.
R4: k2, p4, k2.
R5: p2, k4, p2.
R6: k2, p4, k2.
R7: p2, 2/2 LC, p2.
R8: k2, p4, k2.
R9: p2, k4, p2.
R10: k2, p4, k2.
R11: p2, 2/2 RC, p2.
R12: k2, p4, k2.
R2 (WS): k2, p4, k2.
R3: p2, 2/2 RC, p2.
R4: k2, p4, k2.
R5: p2, k4, p2.
R6: k2, p4, k2.
R7: p2, 2/2 LC, p2.
R8: k2, p4, k2.
R9: p2, k4, p2.
R10: k2, p4, k2.
R11: p2, 2/2 RC, p2.
R12: k2, p4, k2.
4-Stitch Alternating or Snake
This stitch uses both a:
2/2 Right Cross and
2/2 Left Cross
This cable is worked by alternating 2/2RC and 2/2LC cables over 4 stitches of Stockinette stitch.
Notice how the same 2 sts are always moved. Two (2) purl sts are worked on either side to make the cable "pop".
The red border surrounds the set of stitches that is repeated over and over to form the "snake". (Rows 9 to 12 in the chart are the beginning of the second repeat and shown only as a match for the picture.)
The chart and directions are given for flat knitting (notice that odd-numbered rows are at the right and even-numbered rows are at the left of the chart).


©2015-2021 Impeccable Knits